How Do You Draw Lines in Google Earth
Creating Start/Finish lines in Google Earth
-
- Last updated
- Save as PDF
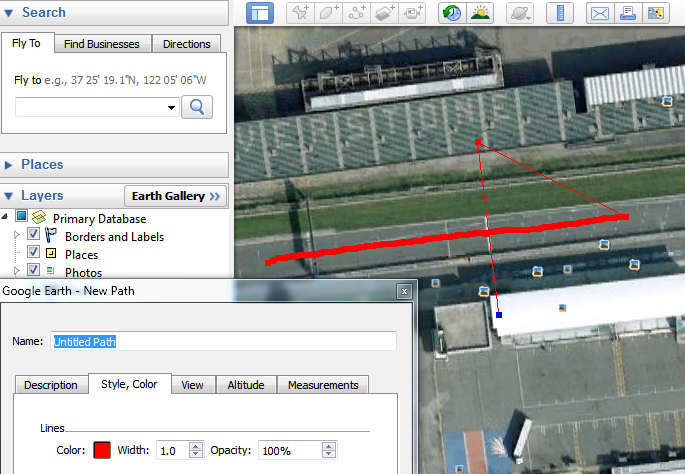
To create start/finish lines using Google Earth, f ind your track location. When you have located the track, to start drawing the start/finish lines, click the 'Add Path' button in the toolbar, highlighted below.
.png?revision=1)
A window will appear. You should move this to the edge of the screen so you can still see the track. This window will remain open until you have finished drawing your start line.
Clicking on the map will leave a point on the map. Any subsequent points will be connected in the order that they are drawn. To select a certain point, you can just click on it (this allows for placing additional points in between existing points).
Drawing the start/finish lines
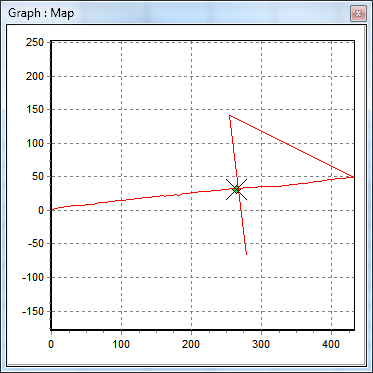
Click and drag to draw a line down the track leading up to, and over the start line in the same direction as you intend to drive. Keep the line as straight as possible to allow good heading values to be calculated. After the start line has been crossed by at least 10 points, release the mouse button. You should then single click to add two separate points that create a 'line' across the start position - see example below.
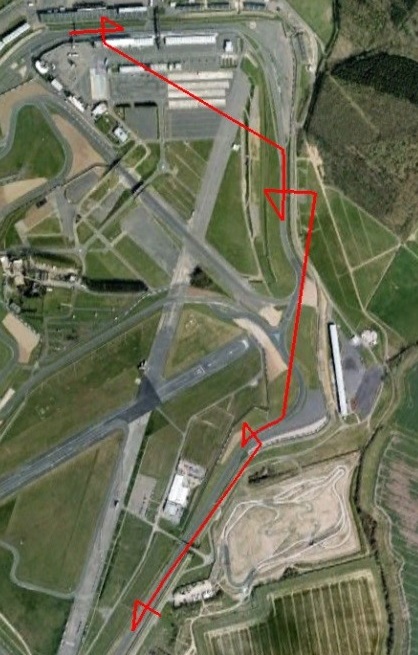
To add a separate finish line, or split points, simply add more lines around the track in the desired positions, adding crossovers for each point so it can be easily identified. The example below has a start line, two split points and a separate finish line.
Now your line is drawn, name it and click 'OK' in the window that appeared when you clicked the Add Path button.
Saving the SPL/DSF file
Step 1
The file should now appear in the LH toolbar on Google Earth under Places. Right click on the file and select 'Save Place As...' to save to your desired location.
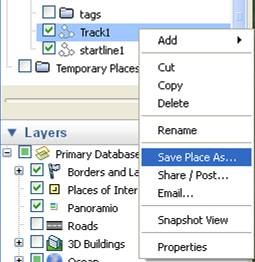
Make sure to change the file type to .kml in the dropdown list.

Step 2
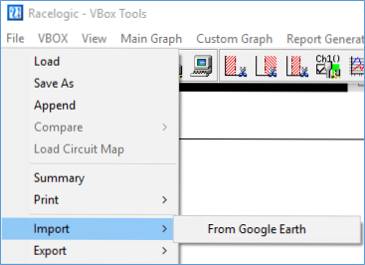
To convert the new KML file into a SPL/DSF start/finish line file, open ' VBOX Tools ' software. When the software is open, select 'File' > 'Import' > 'From Google Earth'.
Now you must set the start point. Click on the 'data' graph to locate the cursor and move the cursor to the crossover point.
Note: Using ALT + Arrow keys moves the cursor sample by sample. Once your cursor is sitting at the start point, press the space bar.
A window will now appear telling you the start line has been set and a green dot will appear on your map graph.
To add split points or a separate finish point, again position the cursor in the desired crossover position. Pressing 'S' will set split points, and pressing 'Shift + Spacebar' will set the separate finish.
When all the points have been set, click on 'Main Graph', then select ' Start / Finish / Split Lines' and 'Save' from the drop down lists.
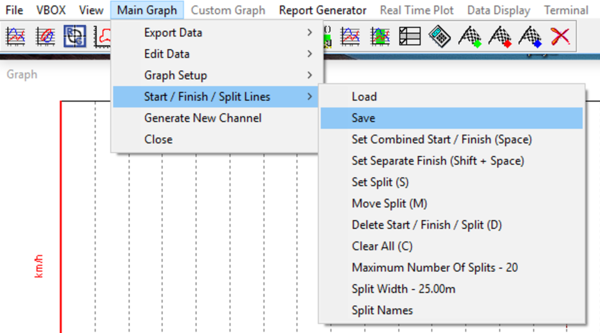
In the next window that appears, you can choose whether to save the file as a .SPL file or a .DSF file. A Video VBOX or VBOX Video will accept either of these when loaded into a scene, but only a .DSF file on an SD card. A PerformanceBox or DriftBox will only use a .DSF file.

This .SPL or .DSF file file can now be loaded into VBOX Video/ Video VBOX Setup or directly in to a VBOX.
Loading into VBOX Video HD2 Setup Software
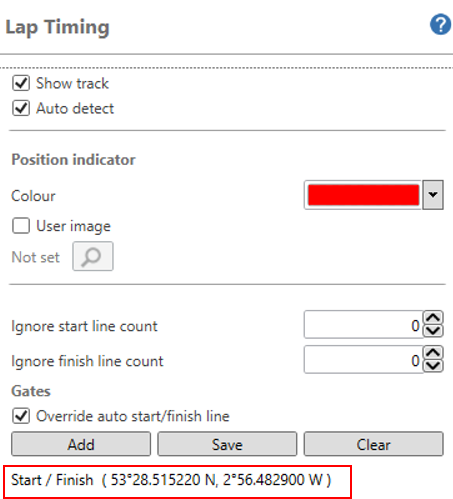
The file can be loaded by ticking 'Override auto start/finish line' under 'Gates' in the Lap Timing menu and selecting 'Add'. Y ou can see the Start/Finish line has been loaded by the visible lateral and longitudinal values under the Lap Timing menu.
Loading into Video VBOX SetupSoftware
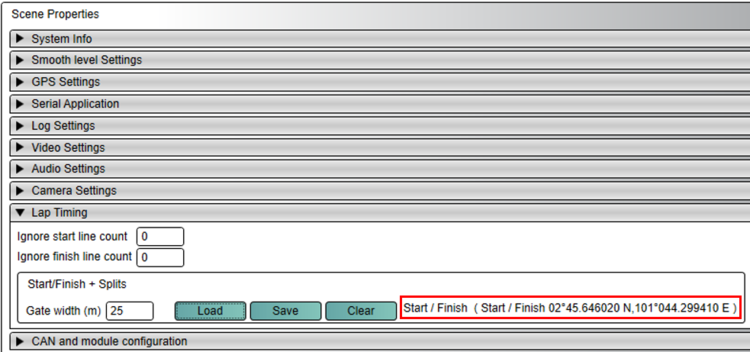
Load the file into the scene under 'Start/Finish + Splits' within the Lap Timing Menu in Scene Properties. Y ou can see the Start/Finish line has been loaded by the visible lateral and longitudinal values under the Scene Properties.
Loading into a VBOX Video HD2 or Video VBOX
Save the .DSF file onto the root of an SD card and put the card into the unit.
Loading into a VBOX Touch orPerformance Box Touch
S ave the .SPL file into a folder named ' SF LINES ' on an SD card and insert the card into the unit, then press the 'Load Lap Timing Gates' button within the Lap Timing Settings . If only one file is located on the SD card, the file will be loaded immediately. If multiple files are located on the SD card, the unit will display all available files. Select a file and then press the Confirm Button  on the bottom right of the screen. When loaded, a success screen will briefly display to show that the start/finish line was loaded successfully.
Loading into a PerformanceBox or DriftBox
S ave the .DSF file into a folder named 'DATA' on an SD card and put the card into the unit, then select 'Load Splits' from the Lap timing menu. The file must be called 'DBOX.DSF' to be detected by the unit.
How Do You Draw Lines in Google Earth
Source: https://en.racelogic.support/VBOX_Motorsport/01General_Information/Knowledge_Base/Creating_Start%2F%2FFinish_lines_in_Google_Earth
0 Response to "How Do You Draw Lines in Google Earth"
Post a Comment